Is your once-speedy Windows 11 machine slowing down? Are downloads failing due to mysterious “low storage space” warnings? You’re not alone. Our daily digital activities generate a surprising amount of clutter – temporary files, leftover program data, and miscellaneous bits and bobs that lurk unseen, eating away at valuable storage space and hindering performance.
The culprit? Junk files. These digital dregs can significantly impact your Windows 11 experience. But fear not! This comprehensive guide will equip you with the knowledge and tools to tackle those pesky junk files effectively.
We’ll delve into what junk files are, why they accumulate, and most importantly, how to delete them efficiently in Windows 11. By following these steps, you’ll reclaim precious storage space and restore your system’s performance to its former glory.
What Exactly Are Junk Files in Windows 11?
Imagine your computer as a bustling city. Every program you install, every website you visit, every document you create – it’s like building a new structure or generating traffic. While some of this is essential for the city to function, there’s bound to be leftover debris from construction, temporary traffic signs, or flyers from last week’s events.
Junk files are the digital equivalent of this clutter. They include:
- Temporary files: These are created by programs during operation but are no longer needed once the task is complete. Think of them like construction scaffolding that’s no longer required after the building is finished.
- Internet files: Browsing the web leaves behind a trail of cache (downloaded website data for faster loading) and cookies (small data packets websites store on your device to remember preferences). Imagine them like flyers promoting local shops you visited online.
- Software installation leftovers: Installing programs often creates temporary files or registry entries that aren’t crucial for the program to function. Think of them like leftover building materials after a renovation.
- Unused files: Old downloads, outdated system files, or remnants of uninstalled programs can linger on your device, taking up space.
While individually, these files might be small, they can accumulate over time, significantly impacting your device’s storage capacity and performance.

Why Should You Delete Junk Files in Windows 11?
Think of your storage space like a precious treasure chest. The more junk you accumulate, the less room there is for the things you truly value – photos, videos, games, or essential applications. Deleting junk files in Windows 11 offers several benefits:
- Boosts Performance: A cluttered system can slow down your device’s processing speed. Removing junk files frees up resources and allows Windows 11 to run smoother and faster.
- Increases Storage Space: Every gigabyte counts! Reclaim valuable storage space by getting rid of unnecessary files. This allows you to install new apps, download movies, or capture more memories without worrying about running out of room.
- Improves System Stability: Temporary and leftover files can sometimes conflict with programs or the operating system. Deleting them can help prevent crashes and unexpected behavior.
Now that you understand the importance of deleting junk files in Windows 11, let’s explore how to tackle them effectively.
Conquering the Clutter: How to Delete Junk Files in Windows 11
Thankfully, Windows 11 offers built-in tools to help you manage junk files. Here’s a breakdown of the most effective methods:
-
- Utilizing Disk Cleanup: A Classic for a Reason
Disk Cleanup is a tried-and-true tool that’s been around for many Windows iterations. It’s a fantastic first line of defense against junk files in Windows 11:
-
-
- Search and Launch: Open the Start menu and search for “Disk Cleanup“.
- Select the Drive: A window will appear prompting you to choose the drive you want to clean up. Select your primary drive (usually C:) and click “OK”.
- Analyze and Choose: Disk Cleanup will analyze the drive and present you with a list of junk file categories you can delete. These might include temporary files, internet files, thumbnails, and more. Select the categories you want to remove and click “OK”.
- Clean Up Confirmation: Disk Cleanup will calculate the amount of space you’ll reclaim and ask for confirmation. Click “Delete Files” to proceed.
- Leveraging Storage Sense: Automation for the Busy User
-
Windows 11 introduces Storage Sense, a more automated approach to managing storage space:
-
-
- Accessing Storage Sense: Open Settings (Windows Key + I) and navigate to “Storage”.
- Enabling Storage Sense : Toggle the switch to “On”. Here, you can configure how often Storage Sense automatically cleans up junk files. Choose from options like “Daily”, “Weekly”, or “Monthly” based on your preference.
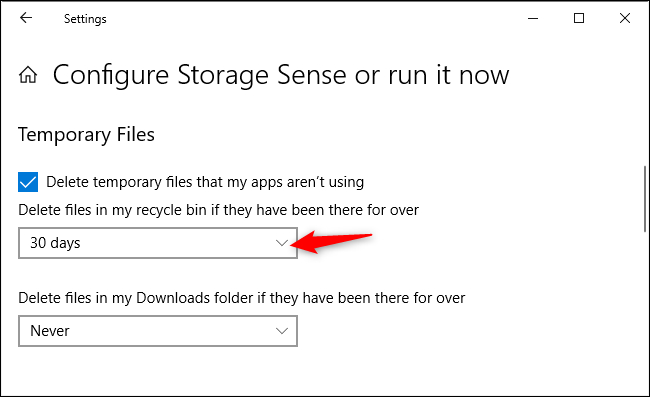
- Customizing Cleanup: Click on “Configure Storage sense or run it now”. This allows you to define which temporary files Storage Sense should automatically clean up. You can also choose to have it automatically clear out the Recycle Bin after a set period.
- Targeting Specific Junk File Types: Manual Cleaning for Granular Control
-
While Disk Cleanup and Storage Sense are fantastic tools, there might be situations where you want more control over what gets deleted. Here’s how to manually target specific junk file types:
-
-
- Temporary Files: These are often located in folders like “C:\Windows\Temp” or “AppData\Local\Temp”. However, be cautious! Deleting system files you don’t understand can cause problems. Only remove files you’re confident are safe to delete.
- Thumbs.db Files: These are hidden files that store thumbnail previews of images and videos. While helpful, they can accumulate over time. You can disable thumbnail generation or manually delete Thumbs.db files from folders.
- Downloaded Files: Your Downloads folder can become a graveyard for forgotten downloads. Regularly review and delete unnecessary files from this location.
- Considering Third-Party Cleaning Software (Optional)
-
While not necessarily essential, some reputable third-party applications offer additional features for managing junk files in Windows 11. These can include:
-
- Deeper Scans: Some programs might scan for a wider range of junk files beyond whatWindows tools offer.
- Driver Updaters: These can identify and update outdated device drivers, potentially improving performance.
- Privacy Protection: Some applications offer features to help manage browsing history and cookies for enhanced privacy.
Important Note: When considering third-party cleaning software, do your research and choose a reputable option with positive user reviews. Avoid applications that make exaggerated claims or pressure you into paid features. Some free cleaners might even bundle unwanted software during installation, so be cautious.
Keeping Your Windows 11 System Clean: Essential Tips
- Schedule Regular Cleaning: Make deleting junk files in Windows 11 a part of your digital hygiene routine. Weekly or bi-weekly cleaning can prevent clutter from accumulating significantly.
- Identify Storage Hogs: Use the Storage section in Settings to identify which apps or files are consuming the most space. Prioritize removing unnecessary data from these sources.
- Uninstall Unused Programs: Review your installed applications and remove any you no longer use. This frees up storage space and can improve system performance.
- Manage Downloads: Don’t let your Downloads folder become a digital landfill. Regularly sort through downloaded files and delete what you no longer need.
- Beware of Unnecessary Startup Programs: Certain programs might launch automatically at startup, slowing down boot times. Use the Task Manager to disable unnecessary startup programs.
By following these steps and understanding the built-in tools available in Windows 11, you can effectively tackle junk files and reclaim valuable storage space. Remember, a clutter-free system is a happy system! Enjoy a smoother, faster, and more enjoyable Windows 11 experience.


Add Comment