Elevate your email game with a polished and professional signature in Outlook. Whether you’re a seasoned Outlook user or just getting started, this guide will walk you through the process of creating and adding a signature that leaves a lasting impression. We’ll cover everything from the basics to advanced features, troubleshooting, and best practices.
The Benefits of Having a Professional Email Signature
Before we dive into the how-to, let’s explore why adding a signature to your Outlook emails is a smart move:
- Conveys professionalism. A well-crafted signature instantly adds a touch of professionalism to your emails, showing that you’re organized and detail-oriented.
- Saves time. No more manually typing out your contact information at the end of every email. A signature does the work for you.
- Reinforces your brand. For businesses, incorporating logos or branding elements in signatures helps reinforce brand recognition with every email sent.
- Builds credibility. Including your contact details in a clear and concise signature establishes trust and makes it easy for recipients to reach you.
While a basic signature typically includes your name, title, and contact information, you can customize it further to include details like your website, social media links, or any other relevant information.

Step-by-Step: Adding a Signature in Outlook
Follow these detailed steps to create and add your signature in Outlook:
For Outlook Desktop Applications (Windows/Mac):
- Open your Outlook desktop application.
- Click on the “File” tab in the top left corner.
- In the “File” menu, select “Options” to access settings.
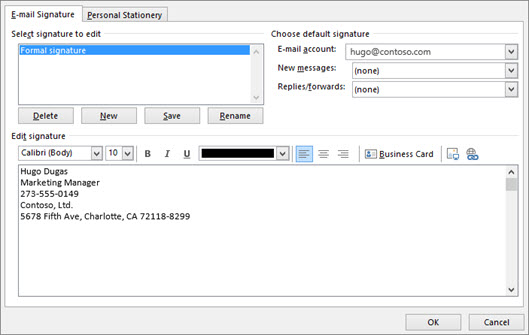
- In the settings window, find the “Mail” section and click on “Signatures.
- Click “New” to create a new signature and enter a name for it.
- In the signature editing window, enter your desired information, such as your name, title, company, phone number, and email address.
- Use formatting tools to structure your signature, add emphasis with bold or italics, and even include a company logo or image (ensure appropriate size and file format).
- Choose the email account(s) you want the signature associated with from the “Default signature” dropdown menu.
- Select when you want the signature automatically included (new messages, replies, or forwards).
- Click “OK” to save your signature and close the settings window.
For Outlook Web App:
- Log in to your Outlook web app.
- Click on the gear icon in the top-right corner to access settings.
- In the settings menu, select “Mail.”
- Within “Mail” settings, click on “Compose and reply.”
- In the “Email signature” section, type and format your signature using the available text editing tools.
- Choose the email account for which you want this signature to be the default.
- Click “Save” to finalize your signature.
Note that the specific steps may vary slightly depending on your exact version of Outlook, but the core process remains the same.
Advanced Signature Features in Outlook
Once you’ve mastered the basics, explore these advanced features to take your Outlook signature to the next level:
Multiple Signatures:
Create and manage multiple signatures for different purposes. For example, have a formal signature for business emails and a more casual one for personal messages. Assign specific signatures to different email accounts and use keyboard shortcuts to switch between them easily.
Electronic Business Cards (vCards):
Attach a digital contact card (vCard) to your signature, allowing recipients to quickly import your details into their address books with a single click.
Images and Logos:
Enhance your brand identity by incorporating a company logo or professional image in your signature. Be mindful of file size and format to ensure compatibility and avoid cluttering the email layout.
Dynamic Signature Elements:
Utilize third-party add-ins to create dynamic signatures that automatically update specific elements, such as your phone number or website URL, eliminating the need for manual edits when this information changes.
Troubleshooting Outlook Signature Issues
If you encounter problems with your Outlook signature, try these troubleshooting tips:
- Signature not appearing: Double-check your default signature settings and ensure they are assigned to the correct email account.
- Formatting issues: Verify that your desired formatting (bold, italics, line breaks) is applied correctly within the signature editing window.
- Outdated Outlook version: Ensure you’re using a recent version of Outlook, as older versions may have limited signature functionalities.
If issues persist, consult official Microsoft support resources for further guidance.
Email Signature Best Practices and Tips
To make the most of your Outlook signature, keep these best practices in mind:
- Keep it concise. Aim for a clear and concise signature that conveys essential information without overwhelming the recipient.
- Prioritize readability. Use proper formatting and spacing to ensure your signature is easy to read across different devices.
- Maintain professionalism. Stick to a professional tone and avoid excessive use of emojis or informal language.
- Update regularly. Review and update your signature information periodically, especially if your contact details change.
The Future of Outlook Signatures
As technology advances, we may see even more sophisticated signature features in future Outlook versions, such as:
- Interactive elements: signatures with clickable links to social media profiles or scheduling tools.
- Cloud-based management: centralized signature management for easier creation and application across devices.
- AI-powered personalization: signatures that automatically adapt based on the recipient and communication context.
We’ll keep an eye on these developments and update this guide accordingly.
Conclusion
By following the steps and advice in this comprehensive guide, you’ll be well-equipped to create and add a professional signature to your Outlook emails. A well-crafted signature is a subtle yet impactful way to enhance your communication, build trust, and leave a lasting impression on your recipients.
Remember, your email signature is an extension of your professional brand. Take the time to create a signature that reflects your style and provides the information your contacts need. With a polished Outlook signature in place, you’ll be ready to send emails with confidence and style.


Add Comment