Feeling like your Gmail account is drowning in a sea of labels? Do you spend more time organizing than reading emails? Worry not, fellow digital warriors! Conquering label clutter is an achievable feat. This comprehensive guide will equip you with the knowledge and steps to efficiently delete labels in Gmail, reclaiming control over your inbox and streamlining your email experience.
Understanding Gmail Labels: The Cornerstone of Organization
Before diving into deletion, let’s establish a clear understanding of Gmail labels. Unlike folders, which can contain other folders in a hierarchical structure, labels act more like tags. A single email can have multiple labels applied, allowing for more flexible organization across categories.
However, with great labeling power comes great responsibility (or shall we say, potential for label overload!). If you find your labels becoming unwieldy, it’s time to consider some strategic deletion.
When to Delete Labels in Gmail: Identifying Candidates for Cleanup
Here are some key situations where deleting labels in Gmail might be the optimal solution:
- Duplicate Labels: Did you accidentally create multiple labels with similar purposes (e.g., “Work” and “Work Stuff”)? Consolidating these labels into one will improve organization and reduce redundancy.
- Unused Labels: Have certain labels become obsolete or irrelevant to your current workflow? Deleting unused labels declutters your sidebar and simplifies navigation.
- Overly Specific Labels: Sometimes, overly specific labels can create unnecessary complexity. Consider merging highly granular labels into broader categories for a more streamlined approach.
Remember: Deleting a label in Gmail doesn’t erase the emails themselves. The emails will simply be unlabeled and remain in your inbox or any other labels they might be assigned to.
How to Delete Labels in Gmail (Multiple Methods for Desktop and Mobile)
Convinced it’s time to streamline your labels? Here’s a breakdown of the various methods for deleting labels in Gmail, applicable to both desktop and mobile users.
Desktop Users:
Method 1: Utilizing the Labels Section
- Open Gmail: Fire up your favorite web browser and navigate to the Gmail website at https://mail.google.com/mail/u/0/.
- Locate the Labels Section: On the left-hand side of your Gmail interface, you’ll find a vertical list showcasing your labels.
- Hover Over the Label: Carefully position your mouse cursor over the label you want to delete.
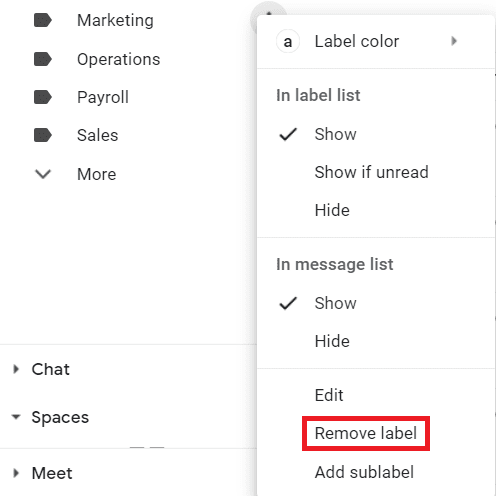
- Click the “More” Arrow: A small down arrow will appear next to the label name. Click on this arrow to reveal a dropdown menu.
- Select “Remove label”: Within the dropdown menu, you’ll see an option labeled “Remove label.” Click on this option.
- Confirm Deletion (Optional): A confirmation pop-up might appear, asking you to confirm your decision to delete the label. If you’re certain, click “Delete.”
Method 2: Utilizing the Label Menu
- Open Gmail Settings: Click on the gear icon in the top right corner of your Gmail interface. This will open a dropdown menu. Select “See all settings” from the menu options.
- Navigate to the “Labels” Tab: Within the Settings menu, locate the “Labels” tab and click on it.
- Find the Label: A list of your labels will be displayed. Identify the label you wish to delete.
- Click “Remove” Label: To the right of each label name, you’ll see a “Remove” link. Click on the “Remove” link corresponding to the label you want to delete.
- Confirm Deletion (Optional): A confirmation pop-up might appear. Click “Delete” to confirm your decision.
Mobile Users:
Method 1: Utilizing the Sidebar Menu
- Open the Gmail App: Locate and launch the Gmail app on your smartphone or mobile device.
- Access the Sidebar Menu: Tap on the hamburger menu (three horizontal lines) in the top left corner of the Gmail app. This will open the sidebar menu.
- Scroll Down to “Labels”: Within the sidebar menu, scroll down until you locate the “Labels” section.
- Tap and Hold the Label: Find the label you want to delete and tap and hold on it for a few seconds.
- Select “Remove label”: A pop-up menu will appear. Choose “Remove label” from the menu options.
- Confirm Deletion (Optional): A confirmation message might appear. Tap “OK” to confirm your decision to delete the label.
Remember: The specific steps for mobile users might vary slightly depending on the device and Gmail app.
Advanced Label Management Techniques in Gmail (Beyond Deletion)
While deleting labels can be a powerful tool, it’s not the only approach to conquering label clutter. Here are some additional strategies to consider:
- Label Merging: Instead of deleting entirely, explore merging duplicate or overly specific labels. This consolidates emails under a broader category, simplifying organization. To merge labels on desktop, navigate to Settings > Labels. Select the checkboxes next to the labels you want to merge, then choose “Merge labels” from the dropdown menu.
- Label Renaming: Sometimes, a simple label name change can work wonders. Opt for clear, concise labels that accurately reflect their content. To rename a label on desktop, follow the steps for deletion (hover, click arrow, select “Rename”) and enter a new label name.
- Label Hiding: Don’t necessarily need a label readily visible all the time? Gmail allows you to hide less frequently used labels from the sidebar menu. This declutters your interface without permanent deletion. To hide labels on desktop, go to Settings > Labels. Uncheck the box next to the label you want to hide.
- Utilizing Search Operators: Gmail’s built-in search functionality can be a powerful tool for locating emails without relying solely on labels. Mastering search operators like “label:” and “from:” allows you to find specific emails efficiently, potentially reducing reliance on overly granular labels.
Beyond the Basics: Leveraging Labels for Advanced Organization
Once you’ve mastered deletion and other management techniques, explore how labels can truly enhance your Gmail experience:
- Creating Nested Labels: For complex organizational needs, Gmail allows nested labels. This lets you create hierarchical structures, like subfolders within folders. This is ideal for categorizing emails by project or topic with sub-categories.
- Applying Labels Automatically: Gmail offers the functionality to automatically apply labels to incoming emails based on specific criteria. For instance, you can set up a rule to automatically label all emails from a particular sender with a designated label.
- Color-Coding Labels: Add a splash of color to your labels! Assigning colors to labels can provide a visual cue for easier identification and organization within your Gmail interface.
The Art of Balance: Striking a Chord Between Organization and Efficiency
The key to label management in Gmail lies in striking a balance between organization and efficiency. Don’t get bogged down in creating overly complex label structures. Aim for a system that works for you, facilitates easy email retrieval, and avoids overwhelming label clutter.
This guide has equipped you with the knowledge and tools to confidently manage labels in Gmail, from deletion strategies to advanced organization techniques. Remember, a well-organized inbox translates to a more streamlined and productive email experience. So declutter those labels, embrace the power of search, and reclaim control over your Gmail domain!








Add Comment