Capturing moments has extended beyond just photographs and videos; it encompasses the quick snapshots we take of our computer screens. Whether it’s for work, creating tutorials, or saving a fleeting moment on the web, knowing how to take a screenshot on your Mac is an essential skill. This guide dives deep into the art of taking screenshots on a Mac, blending Apple’s official recommendations with practical advice from the tech community. It’s designed to be both authoritative and accessible, ensuring you can quickly learn how to capture anything on your screen with ease.
1. Keyboard Shortcuts: The Quickfire Method
MacOS offers a range of keyboard shortcuts for taking screenshots, providing a fast and efficient way to capture your screen without the need for additional software:
- Capture the Entire Screen: Press
Shift + Command + 3. The screenshot will automatically save to your desktop as a PNG file, ready for you to view, edit, or share.
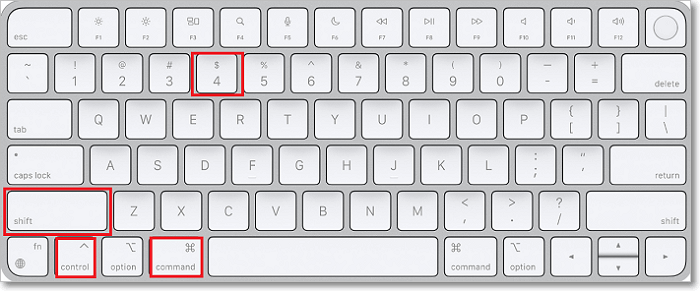
Credit – EaseUS - Capture a Specific Area: Use
Shift + Command + 4, then drag to select the desired area. This is perfect for when you need only a portion of your screen.
Credit – Awesome Screenshot & Recorder - Capture a Window or Menu: Press
Shift + Command + 4, then tap the Space bar and click the window or menu you wish to capture. For a cleaner look, hold down the Option key while clicking to exclude the window’s shadow.
2. Screenshot Tool: Advanced Capturing
For those seeking more flexibility and features, the Screenshot tool in macOS is your go-to. Accessed by pressing Shift + Command + 5, it offers:
- Various Capture Modes: Choose from capturing the entire screen, a selected window, or a specific portion.
- Timed Capture: Set a delay for your screenshot, giving you time to arrange everything perfectly on your screen.
- Custom Save Locations: Directly choose where your screenshots are saved, avoiding desktop clutter.
- Format Options: Select between PNG for high quality or JPEG for smaller files.
Elevate Your Screenshot Skills
- Clipboard Captures: Add the Control key to any shortcut to copy the screenshot directly to your clipboard, bypassing file saving.
- Custom Shortcuts: Tailor the screenshot shortcuts to fit your workflow by customizing them in System Settings.
Frequently Asked Questions (FAQs)
- Can I edit a screenshot immediately after taking it on a Mac? Yes, clicking the thumbnail preview that appears allows you to quickly edit the screenshot.
- Is it possible to change the default save location for screenshots? Absolutely, through the Screenshot tool’s options menu, you can specify a different save location.
- How can I capture a screenshot of a menu without including the title? Use the
Shift + Command + 4shortcut, press the Space bar, then click the menu. - Can screenshots be taken of touch bar content? Yes, by pressing
Shift + Command + 6, you can capture what’s displayed on your MacBook Pro’s Touch Bar.
Capturing screenshots on a Mac is straightforward, whether you prefer quick keyboard shortcuts or the versatility of the Screenshot tool. With this guide, you’re now equipped to document everything from the highest scores in your favorite games to important work-related information. Remember, practice makes perfect, so start exploring these functionalities to become a screenshot pro in no time!


Add Comment