Considering a social media detox? Maybe you’re revamping your online presence or just want a clean slate. Whatever your reason, deleting all your Facebook posts can be a surprisingly liberating experience. But with years of memories (or memes) potentially accumulated, how do you tackle this digital decluttering project?
Fear not, fellow Facebooker! This guide will walk you through the process of deleting all your posts, step-by-step, on both desktop and mobile.
Establishing Key Points
Before we dive in, let’s establish some key points:
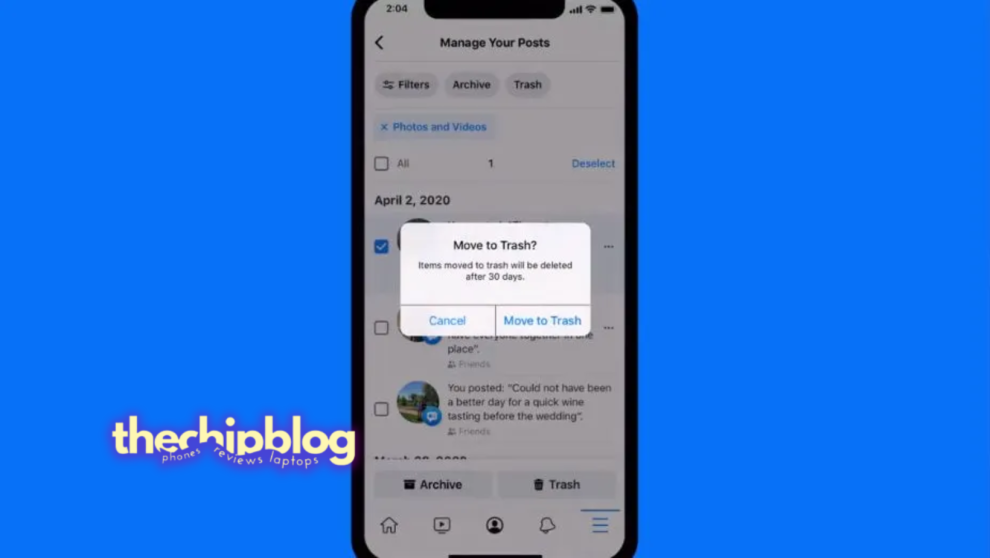
Permanence: Deleted posts are sent to Facebook’s recycle bin for 30 days before being permanently erased. So, you have a window of opportunity to restore anything accidentally deleted.
Selective Deletion: While this guide focuses on deleting all posts, Facebook also allows you to target specific posts or filter them by date.
Third-Party Apps: There are no built-in options for mass deletion through third-party apps. However, you can download your Facebook data, which includes your posts, using some third-party tools (be cautious and use reputable sources).
So, You Want to Delete All Your Facebook Posts? Here’s How!

Now that we’ve covered the essentials, let’s get down to business! Here’s a detailed breakdown of deleting all your Facebook posts on both desktop and mobile:
On Desktop:
- Accessing Your Activity Log: Head to your Facebook profile page. Click the three-dot menu button (…) on the right side, just below your cover photo. From the dropdown menu, select “Activity Log.”
- Filtering for Posts: In the left-hand menu of the Activity Log, navigate to “Your Activity Across Facebook” and then click on “Posts” followed by “Your Posts.” This ensures you’re only viewing posts you’ve created.
- Selecting Posts for Deletion: You’ll see a list of all your Facebook posts. There are two ways to select them for deletion:
- Individual Selection: Click the checkbox next to each post you want to delete.
- Mass Deletion: To delete all posts at once, look for the “Select All” checkbox located at the top of the post list.
- Sending to Recycle Bin: Once you’ve selected your posts (all or some), look for the “Trash Bin” icon at the bottom right corner. Clicking this will send the selected posts to Facebook’s recycle bin.
- Emptying the Recycle Bin (Optional): Deleted posts reside in the recycle bin for 30 days before permanent deletion. If you’re confident about your decision and want to permanently erase them, go back to your Activity Log, click “Recycle Bin” in the left menu, select all posts (if not already done), and choose “Delete.”
Conquering the Mobile App: Deleting All Facebook Posts
Prefer to manage your social media on the go? No problem! Here’s how to delete all your Facebook posts using the mobile app:
- Opening Your Profile: Launch the Facebook app and tap on your profile picture in the bottom right corner. This will take you to your profile page.
- Accessing Activity Log: On your profile page, tap the three horizontal lines menu button located in the top right corner. Scroll down and select “See Your Profile.”
- Finding the Manage Activity Option: On your profile page, tap the “Activity Log” button just below your cover photo.
- Filtering for Posts: Similar to the desktop version, tap on “Your Activity Across Facebook” followed by “Posts” and then “Your Posts” to ensure you’re only viewing your own posts.
- Selecting and Deleting Posts: Here’s where the mobile app differs slightly. You won’t find a “Select All” option. However, you can still achieve mass deletion:
- Batch Deletion: Tap and hold on any post you want to delete. A menu will pop up. Select “Delete” and confirm your choice. Repeat this process for multiple posts.
- Emptying the Recycle Bin (Optional): Just like the desktop version, deleted posts go to the recycle bin for 30 days. To permanently erase them, go back to your Activity Log, tap “Recycle Bin,” select all posts you want to permanently delete, and choose “Delete.”
What if I Accidentally Deleted a Post?
Don’t panic! Facebook offers a 30-day grace period where you can recover deleted posts from the recycle bin. Here’s how:
- Access Your Activity Log: Head to your Activity Log on either desktop or mobile (refer to the previous steps for navigation).
- Navigate to Recycle Bin: In the left-hand menu, select “Recycle Bin.” This will display all your deleted posts.
- Restoring the Post: Locate the post you want to recover and click or tap the three dots (…) next to it. A menu will appear with the option to “Restore.” Clicking this will bring your post back to your timeline.
Can I Delete Posts Created on Other People’s Timelines?
Unfortunately, you cannot directly delete posts you created on other people’s timelines. Those posts are under the control of the profile owner. However, you can:
- Untag Yourself: If you’re tagged in a post you want to disappear from, you can untag yourself. This removes your name and profile picture from the post, but the post itself will still be visible on the other person’s timeline.
- Request Removal: If you’re uncomfortable with a post you’re tagged in, you can politely request the person who posted it to remove it.
Is There a Way to Delete All Facebook Posts Faster?
While there’s no built-in “mass delete” function on Facebook, here are some ways to streamline the process:
- Utilize Filters: On both desktop and mobile, you can filter your Activity Log by date range. This allows you to focus on deleting posts from a specific period, reducing the overall selection.
- Batch Deletion on Mobile: While the mobile app lacks a “Select All” option, you can delete posts in batches. Hold down on a post to initiate deletion, and then repeat for multiple posts.
Should I Consider Downloading My Facebook Data Before Deleting Posts?
This is a personal decision. Downloading your Facebook data creates an archive of your posts, photos, videos, and other information. This can be a good safety net in case you accidentally delete something or ever want to revisit old memories.
What About Third-Party Apps for Deleting All Facebook Posts?
Be cautious! Facebook doesn’t officially endorse any third-party apps for deleting your posts. Using unverified apps could compromise your account security. If you decide to explore this option, do thorough research and choose a reputable app with strong security measures.
After Deleting All My Posts, Will My Facebook Account Be Deactivated?
No, deleting your posts will not deactivate your Facebook account. Your account will still be active, and you can continue using Facebook as usual, just without your past posts.
I’m Hesitant to Delete All My Posts. Are There Alternatives?
Absolutely! If deleting everything feels too drastic, consider these alternatives:
- Limit Past Posts: This privacy setting allows you to restrict who can see your older posts. You can choose to make them visible only to friends or even hide them altogether.
- Archive Posts: Archiving hides posts from your timeline but doesn’t delete them permanently. You can access them later if you wish.
- Create a New Profile: If you want a fresh start, you can create a new Facebook profile altogether.
Conclusion: Taking Control of Your Digital Footprint
Deleting all your Facebook posts is a powerful way to curate your online presence. By following the steps outlined above and considering the FAQs, you can approach this process with confidence. Remember, it’s your social media experience, and you have the control to shape it how you see fit.
So, are you ready to hit delete and declutter your Facebook timeline? With the knowledge you’ve gained from this guide, you can tackle this task efficiently and effectively. Happy cleaning!


Add Comment